
My tips on a streamlined, budget-friendly decoration process. Whether it’s a redesign or starting from scratch, this process will set you up for success.

Hannah Michelle Lambert,
My interior decoration process (on a budget)
Redecorating a room or starting from scratch with a new place is always really exciting. If you’re like me, you always have about 2580532 ideas that you want to put in action. Which is fun, but also a little bit overwhelming. If you just dive in blindly, sure you can get it done and it will probably look good eventually. But if you put in place a decoration process to guide your creative juices in the right direction, you’ll end up with something a lot more striking and probably in a lot less time.
It took me a while to find my groove for my decoration process. And a little help from The Interior Design Institute. Especially if you’re trying to do it on a budget, it seems easiest to buy things whenever you find a good deal. And you cross your fingers it all comes together sometime this year. But trust me, it’s possible to give yourself some structure and still stay within that budget. The outcome of this structure is a lot more cohesive design scheme in a lot less time.
Keep reading to find out my complete crash course on my budget-friendly decoration process. Get a snack, this might take a while. Feel free to bookmark this to refer back to when you have an ongoing project. You can also download a printable decoration checklist here!
- Evaluate your current space
- Think of your vision on a practical and abstract level
- Find your inspiration
- Create your floor plan + shopping list
- Shop secondhand first
- Then shop new
- Assemble, arrange, evaluate
1. evaluate your current space to decide what the decoration process will look like
If you are redesigning a room rather than starting from scratch, it’s important to nail down what’s working for you right now. And what’s not. Some problem areas to identify are:
- Adequate storage space
- Adequate seating on a regular basis (consider if you entertain often)
- Is it too cramped with bulky furniture?
- Do you find your furniture and rugs getting dirty super easily? You may want to consider fabrics that can stand more wear and tear/hide stains?
- Is there any furniture you just straight up hate?
- Is there too much on the walls? Not enough?
- Do you want to change up the color scheme?
This list is not complete by any means. So just make sure you look at every single detail in the room and make a note of what you’d like to change. Also note what you like in the space and would like to play up in the redesign.
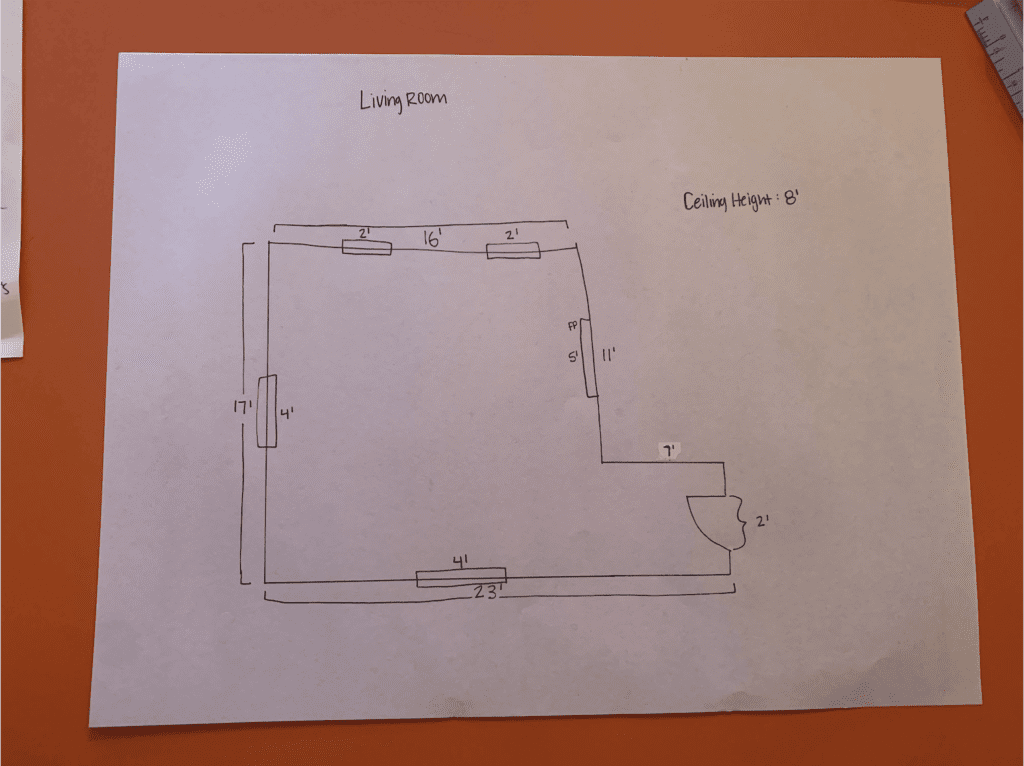
Then, measure everything. Ceiling height, room dimensions, door and window sizes.
If you are starting from scratch, you can think back on your previous rooms in your old place. Consider what worked and what didn’t.
Other than that, just measure the hell out of your new room. Solid measurements will set your decoration process off on the right foot.
2. think of your vision more generally
Before you even consider the more decorative aspects of the room(s), consider it on both a practical and abstract level.
Close your eyes and think about what you envision for the room. What is the practical purpose of the room? What mood do you want the room to convey? Who is going to be using this room?
Once you can decide on the vibes and practicality of the room, go ahead and make 2 lists: one of the absolute necessities/non-negotiables and one that’s more of a wishlist.
Here’s an example of both below for a living room that’s used for entertaining often:
Necessities:
- Seating to accommodate at least 5 people at all times (removable/collapsable additional seating for 4 people)
- A rug that is easy to wash or will hide stains easily
- TV stand to hold a 60″ TV
- Large coffee table to play games on
Wish List:
- Sectional sleeper sofa
- Bar cart
- Large mirror for pictures
3. find your inspiration in all places
This is the fun part that I think everyone tends to start with right off the bat. But if you go into it thinking, “okay, i want a fun, social living room that is good for both entertaining and relaxing,” you’re able to be a lot more focused in your search for inspiration. That’s why the previous step is so important.
Pinterest is always a good place to start. It doesn’t hurt to just scroll through your general feed for a little bit to see what you can find. But then, try putting in the keywords you thought of when considering your room on an abstract level. A search for “relaxing, neutral-colored study” will give you a lot richer results than “office.”
I would encourage you to venture off of Pinterest eventually, though. I love Pinterest, and I will always use it as a resource. But if you depend on it too much for inspiration, your rooms will inevitably fall short of their full potential of uniqueness.
Here are some other great sources of inspiration
- Subscribe to design magazines like Architectural Digest – this will give you a constant stream of inspiration for current and future project
- Instagram – follow your favorite designers, hashtags (#interiordesign, #midcenturymodern, etc), stores, and influencers
- Shows + movies – I get a lot of inspiration from the shows and movies that I watch. As you’re thinking through decoration ideas, watch movies that make you feel good. The inspiration could come in the form of furniture/layout, or it could inspire a piece of artwork you want to get.
- Art museums – If an art museum isn’t a place literally designed to inspire, I don’t know what is. A lot of museums have furniture pieces in them to take inspiration from, but you could also consider what you like best about the prints, photography, and sculptures. You’d be amazed the kind of ideas can come from looking at a simple art piece.
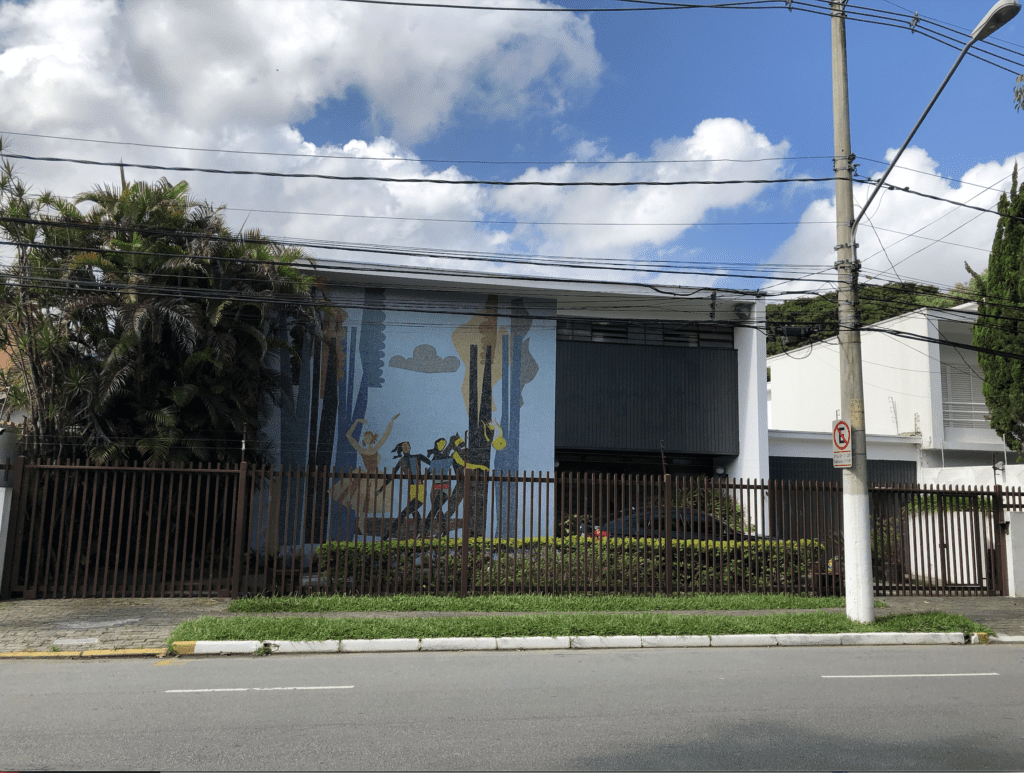
- Take a walk in a nice neighborhood or downtown area – I love doing this. Especially if I’m traveling, one of my favorite things to do is to just walk around and check out the architecture and design. But you don’t even have to travel to do this. Sometimes, I’ll just walk or drive around the boujee areas in the greater Atlanta area. There are definitely some that are just McMansions that I could probably design better myself. But there are some that have really cool architecture, or an interesting sculpture, or an unexpected color scheme. It’s a great idea sparker and is just fun to do.
Once you have your inspiration, decide on the style (bohemian, mid-century, minimalist, a mix of a couple, etc.), your color scheme, and some items you found in your search that you definitely want to incorporate.
4. Put everything together, then make a plan
So you already have your list of necessities and your wishlist, now you have some inspiration that hopefully gave you an idea for the decoration direction you wanna go in.
Now it’s time to combine them together and figure out what tf you actually need to buy (or make).
First thing you want to do to guide this is to create a plan of how you want to arrange furniture in the space. This should definitely include the things on your “needs” list, but also feel free to sprinkle in things from your wish list so you have an idea of how they’re going to fit in the space.
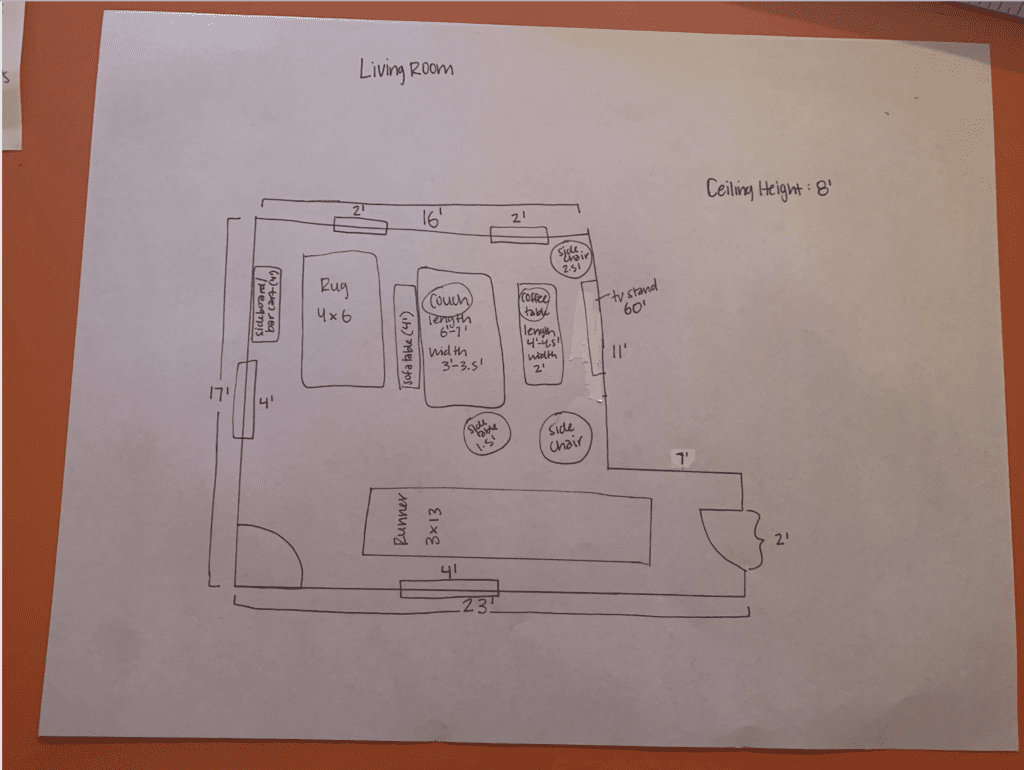
The most important thing here is to include measurements!
They don’t have to be exact, but provide yourself with a range. If you buy a couch that’s too big, it’s not gonna fit. If you buy a couch that’s too small, it’s not gonna match the scale of the room. Give yourself a practical range to stick within and hold yourself to it.
So now take the items on your floor plan and make them into a shopping list that’s more specific than your wishlist or needs list.
When I say specific, I don’t mean picking an actual product. I mean the difference between putting “bar cart” and “30-36″ wooden bar cart with gold details.” You are not stuck to these choices, but it will help you ensure that the theme you have decided on remains clear and cohesive throughout the room.
5. Shop secondhand first
I said we’re gonna be on a budget, and I meant it. The #1 way to do that is to buy secondhand. Not only is this cheaper, but it’s also more sustainable and can help you get really unique items.
This is a great way to get some of the things on your wish list that you want but aren’t sure if you have the budget for. But it’s also a great way to get your bigger items for a lot cheaper, which saves you a shit ton of money that you can then spend on other things.
I don’t think I would do something like mattresses, and use your own judgment on chairs/sofas, but solid wood or metal items, absolutely get those.
My suggestion is to go in-person thrifting, vintage shopping and garage sale-ing to start out.
More people are constantly keeping tabs on apps like letgo, offerup, and Facebook marketplace than physical stores, so your odds of finding a hidden treasure are usually a lot higher — not to mention cheaper.
It’s fun to make a whole day of this. See if a friend wants to go with or just go by yourself, get a coffee and some breakfast or lunch, and hit up all the thrift stores, vintage stores and used furniture stores in one swoop.
Then after your first round of shopping (feel free to have multiple rounds), check out the digital thrift stores.
The key here is to see beyond what’s in front of you. Really tap into your creativity at this point in the decoration process.
If you don’t have much expertise on reupholstering or doing major repairs, don’t get something that requires those skills and set yourself up for failure. But don’t close yourself off to something because it’s painted a really ugly color or the wood finish is fucked up.
Also look beyond its current use. A dining table could easily be a big desk, tablecloth could be a wall hanging, and a big drum could be painted to be a coffee table.
6. Then you get to shop new
After secondhand shopping, hopefully you found some really cool and unique pieces. Even better if they’re the big anchor pieces. Realistically though, you’re going to have to/want to buy some things new, too.
I always prefer to start shopping online with new items, because you usually have a bigger variety of things to choose from. Plus, you can use coupon services like Honey to save you a tonnnn of money. Make sure you sign up for loyalty programs/email lists, too; a lot of them will send you a first-time signup coupon.
When you go in-person shopping, look for coupons if you can, or try to go to the stores on days that they have sales going on. And definitely don’t be afraid to go to the clearance section. That’s actually the first place I go to, and I’m not ashamed. Sometimes things will be there because they have a small scratch or something is loose that can easily be fixed after a quick lesson from Google.
This next tip is optional, but I would recommend taking it: before you have all of your big anchor items (i.e. the things listed on your floor plan) and have them placed in your house, don’t get any accessories (this is only for new items, not thrifted items). Unless they’re on sale or they’re running low, of course. But if it is something full-priced that they keep stocked, hold off just a little bit. And I’ll tell you why in the next step…
7. Assemble, arrange, and evaluate
Put all of your anchor items and thrifted accessories together in the floor plan you came up with earlier. Then sit back and see how it feels. Chances are, it will feel a little different than exactly how you imagined. And that’s okay!
Use this moment to judge if you need another piece of furniture or if you think something needs to be returned. Then evaluate how you want to fill out the space with accessories and artwork.
It might read a little more minimalist than you expected, so you want to go all out on the accessories and wall hangings. Or it might feel a little too busy, so you can disburse the accessories you have in a different way.
Use your gut here in the decoration process. Then once you feel satisfied, shop for the extra things you want to put in — but check secondhand shops one more time before the new stores 😉
And ta-da!
The decoration process is never really done, let’s be honest. You’ll always probably go in and swap out pieces of artwork or candles or figurines. Or you’ll replace a rug or piece of small furniture because you find a deal you can’t resist. But overall, this process has done me well so far and gave me a really solid base to build off of. And it at least readies my place for people to come over without it looking like I just moved in.
I hope this helps you get cracking on your own project and go in with a solid decoration process!
Good luck, and
keep it homey, homies
About me
Hey my name’s Hannah Michelle Lambert, the voice behind homey homies. I’m an LA-based designer, writer, and content strategist. I’m passionate about the intersection of productivity and creativity. I love talking about creative habits, technology, processes, and everything in between that helps me blend the Type A and Type B parts of my brain.


Leave a Comment