
So here I am about a month after my first impressions review and halfway through the course! Overall, I can tell you that I have been pleasantly surprised by the rigor. In these last few courses, shit got a lot more technical.

The Interior Design Institute Review Part 2
The Interior Design Institute Review Part 2: Modules 3-6
So here I am about a month after my first impressions review of The Interior Design Institute. That means I’m halfway through the course!
Overall, I can tell you that I have been pleasantly surprised by the rigor. In these last few courses, shit got a lot more technical. I am happy to say that I’m learning some real, tangible skills that I know will benefit me in my design career going forward.
Another thing: don’t underestimate the workload.
The time I had to spend per module has definitely increased, between more pages to read and lengthier, more involved homework assignments. So I really felt like I was extracting a lot of value out of every single module.
Future me here: If you don’t want to read about my experience with every single module, you can read my comprehensive review here where I rate each aspect of the course. And you can also read my 6-month after review to see how the education stands up after graduation.
But if you want to get a full overview of what you’re potentially about to get into, keep reading. Let’s dig into the modules in more specifics.
The Interior Design Institute module 3: design styles
This module is basically a massive overview of all the different kinds of design styles.
There are most of the popular ones everyone knows of, like mid-century modern, minimalist, Gothic, etc., but there are also some styles that I either didn’t previously have a great understanding of, like the Hamptons or Arts and Crafts, and some that I had never heard of but ended up loving, like Wabi-Sabi.
As I was going through the module, I definitely came to the realization that some of these styles are ones I never want to use. But, it’s important to have a well-rounded understanding of all design styles nonetheless.
One of my favorite things about this unit was all of the inspiration I got looking at the hundreds of pictures they have that demonstrate the styles. I circled so many of them to go back and reference when I want some ideas for styling future spaces.
Although mid-century modern is definitely my go-to style, this helped me to expand my design palette a little bit and see which other styles would be cool to mix and match with it.
the homework
This was definitely the fluffiest homework assignment so far, and the easiest. But it was fun.
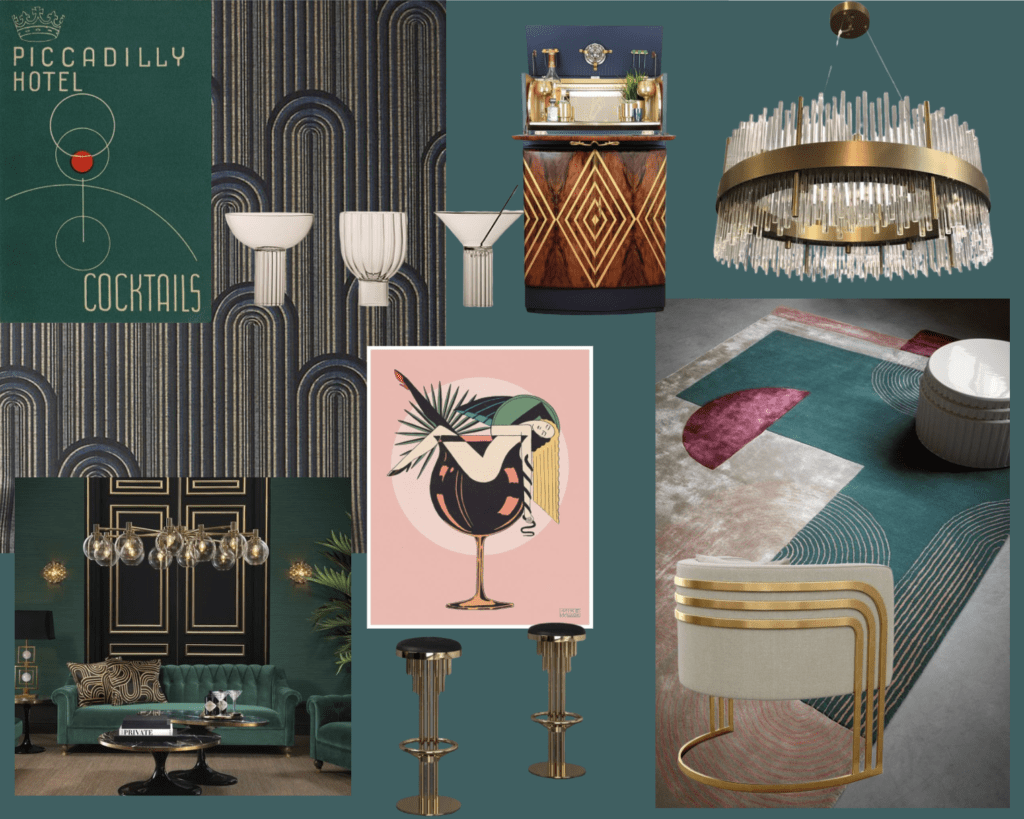
The assignment is to create a mood board for a room based on a design style of your choice and justify your choices.
I chose art deco and wanted to go with a moody, 20’s glamor, cocktail vibe.
The next ones are a lot more involved, though, so use this one as your breather. I challenged myself by not doing a design style that I was previously very familiar with, and I would recommend you doing the same to test your newfound knowledge. But still pick something that interests you, obviously.
My assignment is below:
The Interior Design Institute module 4: space planning
This is where shit got real. This is the technical stuff that I had been excited to dig into. It was a long one, about 50 pages longer than the previous, so make sure you allot time and focus for this.
This module goes into all of the practical and aesthetic considerations when planning the space in a room. It talks about everything from focal points to balance to window selection and wall thickness.
They talk about best practices for each individual type of room, i.e. living room, bathroom, kitchen, etc., and there are so many things that I highlighted to be able to go back and reference throughout my career.
I’m not joking when I say this module is STUFFED full of information. It’s pretty much essential to take really good notes from this module. There is so much stuff that you will really need to be able to easily go back and reference notes rather than depending on memory or skimming.
After you get all the information you could possibly ask for about space planning, they then go into how to draw up a floor plan. The fun stuff!
I’m not going to go into too much detail on all the specifics about this, because it’s honestly a lot, and that’s what the class is for. But I’ll let my assignment below speak for itself.
You’re tasked with a complete redesign of the ground floor of a single-family house.
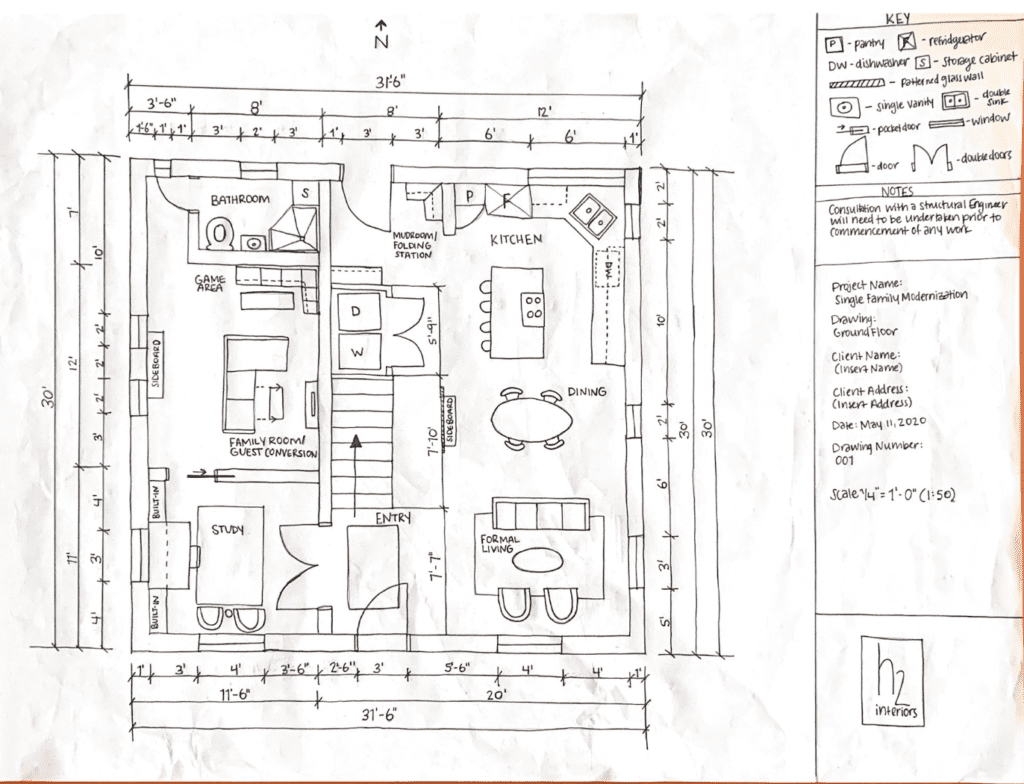
I put a lot of time, energy, and effort into this. All in all, it took me about 4 days/10 hours. I’m not sure if that’s slower or faster than the average person, but I definitely was watching movies sometimes as I was doing it.
I chose to draw it by hand after attempting to do it digitally a first. It’s a lot more satisfying to do it by hand, in my opinion. But I’m planning on becoming proficient in digital modeling eventually. I just think that hand drawing is a great way to get comfortable with the process.
The Interior Design Institute module 5: lighting
Lighting is a lot more than just picking chandeliers and lamps. This module definitely proved it.
Similar to the last module, it breaks the concept down room-by-room. You’ll come out the other side knowing the best kind of lighting for each area in the home.
But it also goes into a lot of the more technical aspects, like calculating foot candles (I had literally never heard of this before), types of artificial light, analyzing the natural light on-site, and a ton more.
Like I said, so much more than lamps and chandeliers. There is actually a formula to figure out how much light you need in each room for certain tasks.
In addition to lighting, it also touches on electrical wiring throughout the house for lighting as well as things like smart home capability, security cameras, appliances, etc.
Although they stress that it’s always good to consult an electrician when making decisions, I feel like this module would give me a good working knowledge to ask the right questions.
the homework
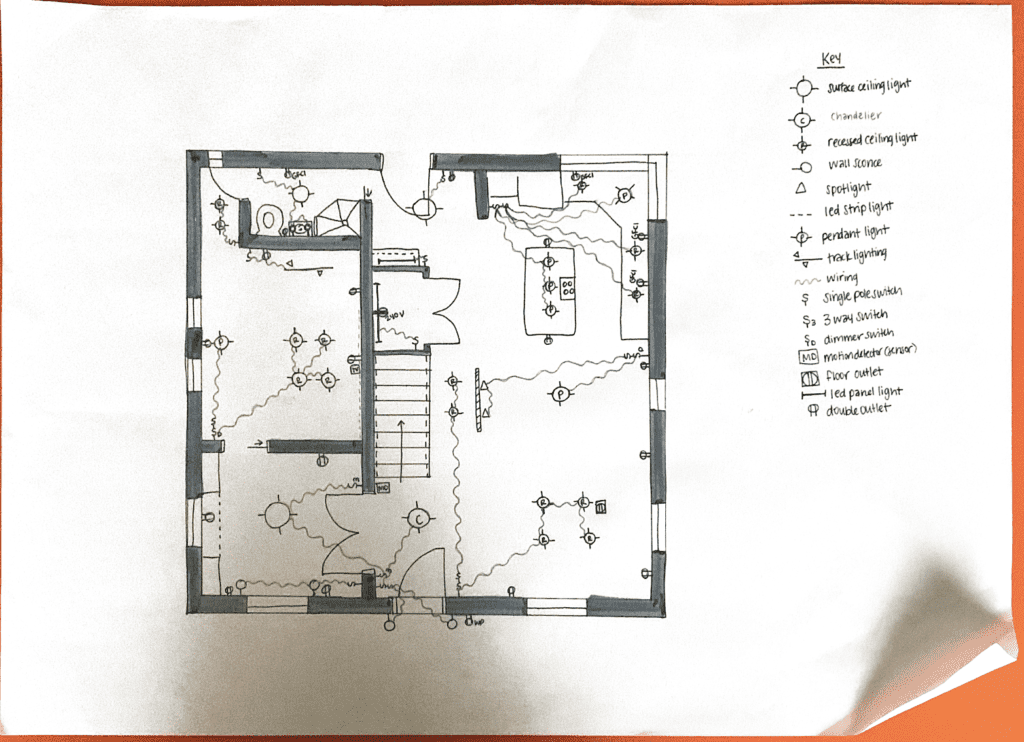
I should mention, the floor plan created in the previous module is going to be built upon throughout the rest of the course. So make sure you’re happy with it. This time, you have to design a full lighting/electrical scheme.
I’ll be honest, I calculated the foot candles for the rooms but ended up completely disregarding my calculations when placing fixtures. Maybe it will be more relevant when I’m selecting actual, specific fixtures. This is only concerned with placement and type of fixture — chandelier, sconce, spotlight, recessed lighting etc. — and not with sourcing actual ones.
I obviously had some specific visuals in mind, but the main concern is the direction and the distribution of lighting.
Another big consideration is the wiring. Will it be triggered by a motion sensor? Is it dimmable? Which switches will control which lights? Which lights will be triggered together or separately.
It’s really helpful to try to imagine yourself walking through and living in the house to consider when you would need lighting and how it’s most easily accessible.
Another part of this assignment is placing outlets. They go through all of the different kinds of outlets, so make sure you pay attention so you know which kinds go where.
Here is a copy of my submission below. I had a really good time doing this one. I’m still awaiting feedback, so we’ll see if I hit the mark, but I think I did pretty well.
The Interior Design Institute Module 6: colors
I am not one to sky away from color, so I was pretty excited to get into this one. Although I used to be color-averse, now I find myself wanting to throw it on everything.
But sometimes I feel like I lack direction, so I was looking forward to learning about the technicalities of color.
Of course, there is a focus on color psychology in the module. They also talk about which colors are best for which activities, creating balance in a color scheme, how the color wheel works, and just a shit ton of other stuff about color.
I found it really interesting when they went into all of the properties that go into a single color, like tone, hue, chroma, etc.
the homework
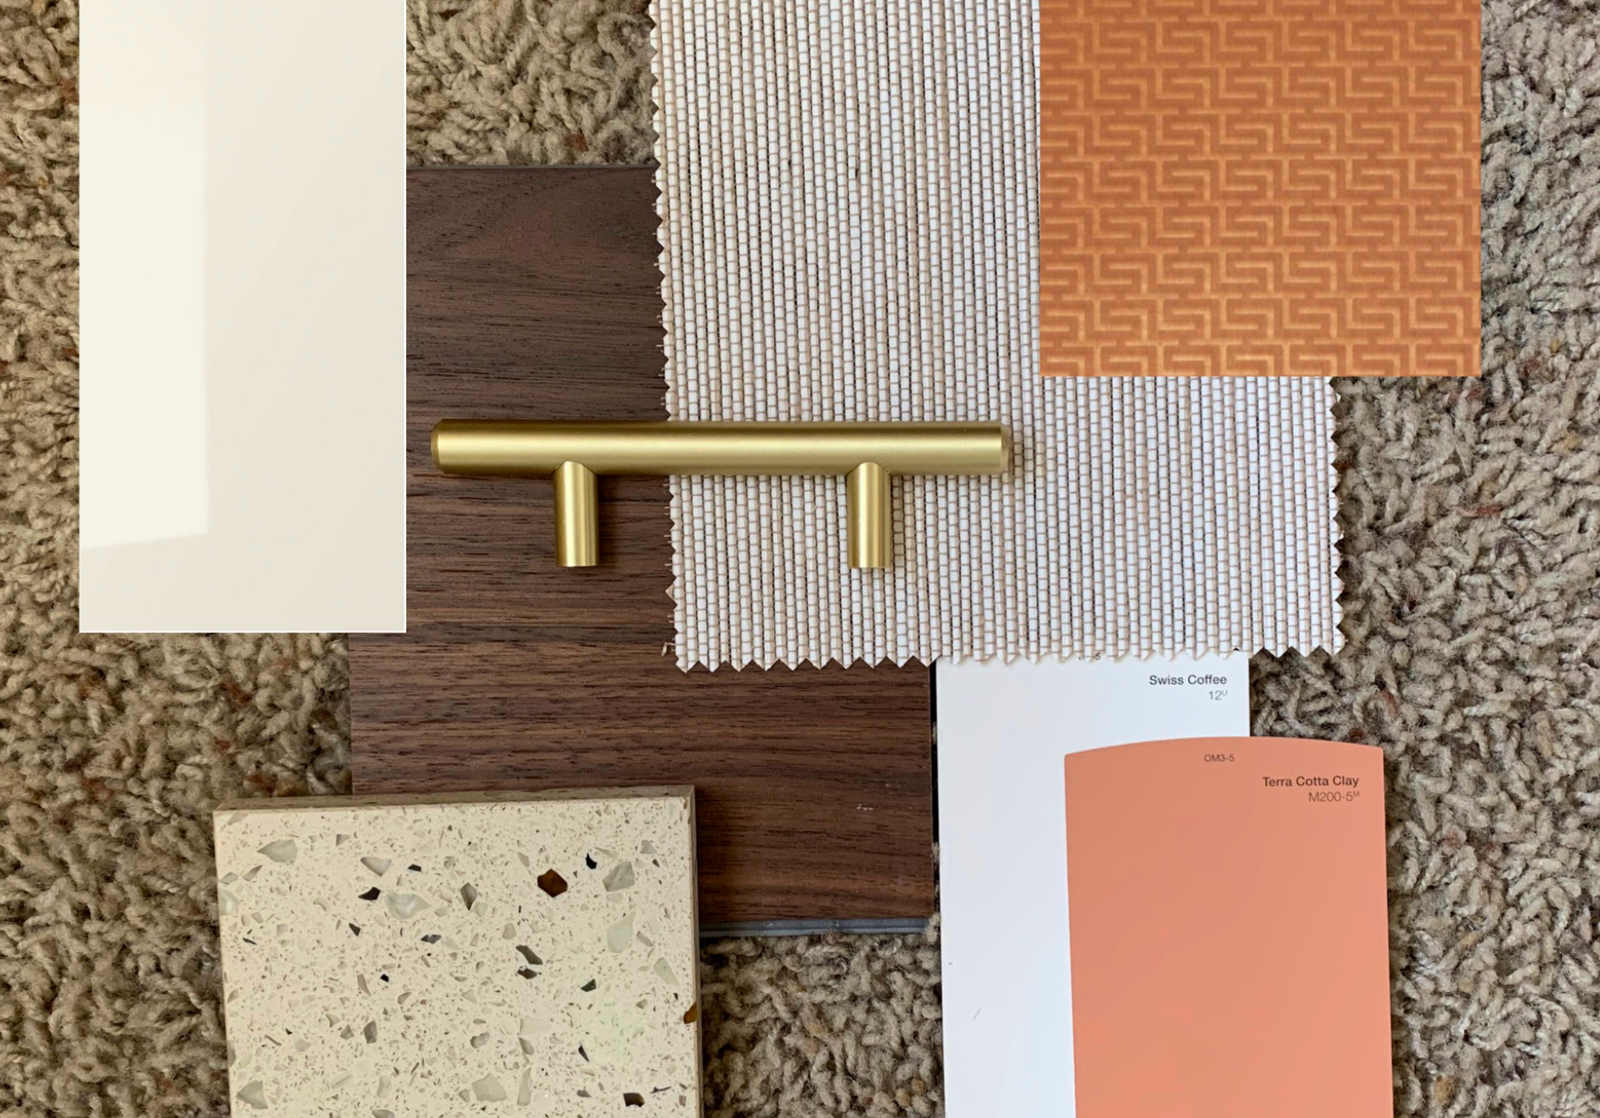
For homework this time, you are creating 3 separate color schemes for the home that you’ve been working with for the last 2 modules. Each of these has to be a different kind of color scheme, i.e. complementary, monochromatic, achromatic, split complementary, etc.
It was surprisingly not as easy as I thought it was going to be. You’re not just painting one room, it’s the whole bottom floor. That means ceilings, baseboards, doors, walls, closets, everything.
I found it really helpful to have my floor plan right next to me and work left to right, almost using it like a checklist for all the major walls and doors. Then I moved on to baseboards and ceilings. It’s a pretty involved assignment, but definitely a great practice in attention to detail.
Here’s a sneak peak of my part of my assignment below. This is just the first 1/3 of what you have to include for each color scheme:

overall impressions
I’m someone who craves details and tangible outcomes, and if you are too, this might be the course for you.
I’m glad to say that there haven’t been any modules so far that I feel were a waste of time. Since it’s a relatively short course (compared to a bachelor’s or associates), I’m very pleased with how much they pack into each module.
Future me here again! If you’re looking for some more confirmation on whether to enroll in the Interior Design Institute or not, check out my other posts where I wrap up my experience:
- A comprehensive review of the Interior Design Institute
- 6 months after the Interior Design Institute: is it still worth it?
About me
Hey my name’s Hannah Michelle Lambert, the voice behind homey homies. I’m an LA-based designer, writer, and content strategist. I’m passionate about the intersection of productivity and creativity. I love talking about creative habits, technology, processes, and everything in between that helps me blend the Type A and Type B parts of my brain.


Love to see this every day !
Howdy would you mind letting me know which hosting company you’re working with? I’ve loaded your blog in 3 completely different browsers and I must say this blog loads a lot faster then most. Can you suggest a good internet hosting provider at a reasonable price? Many thanks, I appreciate it!
Hey! Yeah I use Hostinger. I’m glad to hear that the loading speeds are really fast, this was actually one of the cheapest platforms I found.
Hi! This post could not be written any better! Reading through this post